Purpose
Predicting how much performance impact a specific 3D model will have is difficult, even for experienced professionals. This document provides advanced guidelines for preparing and optimizing 3D models for use in SynergyXR. It outlines detailed best practices, technical standards, and performance requirements designed to help ensure smooth rendering, efficient resource use, and consistent visual quality across all XR platforms.
General Standards
-
Naming Conventions
- Clear, consistent file and mesh naming (e.g. lowercase, no spaces, use underscores).
- Avoid special characters in file, mesh and material names.
- Units, Scale & Object Data
- Ensure the model is built in real-world units (e.g. centimetres, metres).
- Set origin/pivot points logically for expected interaction or animation (e.g. center of door hinge, tool handle, lever rotation, grab point).
Geometry Optimization
-
Optimize Geometry
-
Try to keep the triangle count low (800,000 tris per model is the limit when uploading to the Procedure Builder).
-
Avoid modelling small details directly in geometry when they can be represented more efficiently with textures (e.g. transparent cut-outs, bumps, indents).
-
Bake normal data from a high-detail version of the model onto an optimized version to preserve visual fidelity while maintaining performance.
-
-
Minimize Number of Submeshes
Each material assigned to a model creates a separate submesh. When a single object uses multiple materials, it is automatically grouped into multiple submeshes - one per material slot.
-
Each submesh generates a separate draw call in SynergyXR, so fewer submeshes improve performance.
-
Aim to keep models below 100 submeshes (hard limit: 150).
-
Keep the number of submeshes to a minimum, and use additional submeshes only when necessary (e.g. for animation, interaction, or unique material properties).
-
Always check if the model is using unnecessary submeshes before importing it into SynergyXR.
-
Verify whether each unique material is truly required, or if it could be baked or merged with others to reduce submeshes.
-
Verify that any mesh separation serves a functional purpose (e.g. animation, interaction).
-
Ensure there are no duplicate or unused material slots that could be removed before export.
-
Materials, Shaders and Textures
-
Reduce Materials and Textures
-
Fewer materials/textures improve both memory use and performance.
-
The maximum recommended texture size is 2048 × 2048, but in most cases smaller textures are sufficient.
-
Different textures in a material do not need to share the same resolution.
-
Keep highest resolution for albedo/basecolor map.
-
Use low to medium resolution for occlusion, roughness, and metallic (these are combined into one texture after GLB export).
-
-
Shader Considerations
-
-
Ensure that a compatible shader is used for the materials of the object, even if no texture is used. Don’t use custom shader nodes as these are not supported.
-
Use Opaque blend mode unless transparency is required.
-
For transparent objects, use alpha blending or similar (e.g. Alpha Blend mode in Blender).
-
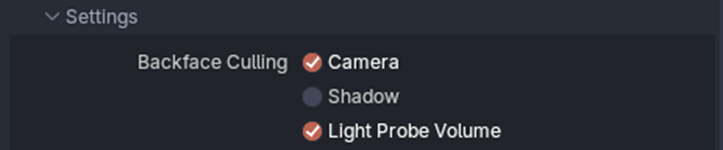
Single vs. Double-Sided Materials
-
Avoid using double-sided materials whenever possible, as they increase GPU workload by rendering both the front and back faces of each polygon. This has a noticeable performance impact in XR, especially on mobile and standalone headsets.
-
Only use double-sided materials intentionally, for example on surfaces that have no physical thickness, where you would otherwise see through the mesh from one side.
-
To make a material single-sided in Blender, you must enable Backface Culling for the material in the material settings before export to have single sided models (better performance, but you can’t “look inside” the model)
-
Mesh Quality
-
Object/Mesh Considerations:
-
Ensure all face orientations are correct.

-
Avoid unwanted custom split normals.
-
Apply Shade Smooth or Shade Flat based on the desired visual style.
-
Use Merge by Distance in Blender to remove duplicate or stray vertices.
-
-
Cleanup Considerations
-
Merge parts that can be combined into a single object to reduce submeshes and draw calls in SynergyXR. Think about the purpose of each model and its use in SynergyXR. (e.g. if it is going to be interacted with or highlighted, it needs to be separate).
-
Remove orphan data (unused materials, textures).
-
Animation and Rigging
-
Animation Considerations
-
The naming of the animations should be representative of the action it is displaying (e.g. robot_arm_rot_0_to_90, door_open, switch_toggle, panel_move_in).
If multiple versions exist, use consistent suffixes (e.g. _slow, _fast, _loop).
-
Ensure looping animations start and end on matching frames for seamless playback.
-
Ensure that the type of animation you’re creating is supported by the GLB format.
-
Supported: object transforms (location, rotation, scale), skeletal (armature) animation, and shape key (morph target) animation.
-
Not supported: particle systems, physics simulations, shader or material property animations, and constraint-driven animation (unless baked into keyframes).
-
-
Keep animation data efficient - remove unnecessary keyframes and bake only essential motion.
-
Texture Considerations
-
Recommended max resolution is: 2048x2048.
-
Use power-of-two texture sizes (128, 256, 512, 1024, 2048, etc.).
Non-square textures are allowed (e.g. 1024×512), but both dimensions should be power-of-two values.
-
Ensure UVs are not stretched and avoid distorting meshes after UVs have been unwrapped.
-
Two UV sets per mesh are supported.
-
The first UV set is typically used for tiling or repeating base textures (e.g. albedo, normal).
-
The second UV set can be used for baked maps such as ambient occlusion (AO) or lightmaps, where the entire model is unwrapped uniquely within the texture space.
-
Recommended maps: Albedo, Metallic, Roughness, Ambient Occlusion.
-
Metallic, Roughness, and AO should be packed into a single texture (R = AO, G = Roughness, B = Metallic) to reduce file size.
Some 3D tools support this packing automatically on export.
Export Considerations
-
Remove any elements not required for the model (e.g. cameras, lights, empties) before export.
-
Always apply scale before export so objects have a uniform scale of 1.0.
-
If objects are parented, apply scale starting from the parent and work down the hierarchy.
-
When using armatures, ensure bones are cleanly named and not scaled non-uniformly.
-
Animation Export Considerations
If your model includes animations, make sure Animation export is enabled.-
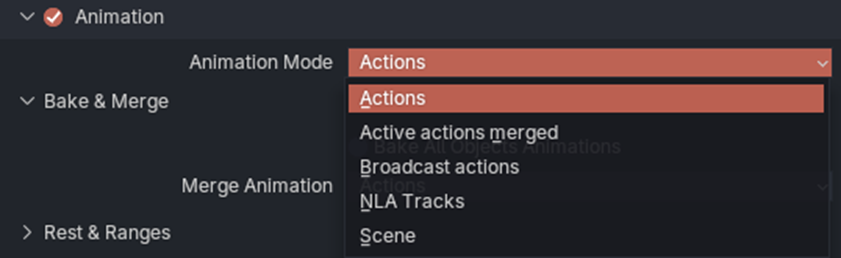
Review the Animation Mode setting to ensure the correct actions are exported. In the Blender export settings, these are the recommended modes:
-
Actions – Exports each action in the file as a separate animation.
-
-
-
Active actions merged – Merges all active actions into one combined timeline.
-
NLA Tracks – Exports only animations organized as NLA tracks (recommended when using Blender’s NLA Editor).