
Introduction
Users need to import and configure content before it can be used. There are four categories of content that are explained in the following sections. Users can import a new piece of content by pressing the small ´+´ under each content category:

Users have the option to select a local file from their PC, or browse the content available on the workspace. Users can also add an "Empty" object to the scene, allowing them to group objects using the Transform Object Action and define the Empty as a new parent.
3D models
Only the .GLB file format is supported for 3D content directly in the Procedure Builder. It is still possible to upload .FBX models through the web-based SynergyXR Manager - this will automatically convert the model to .GLB enabling you to add it in the Procedure Builder using the "Add Workspace File" option.
Once imported, the 3D content is placed in the content configuration scene, where the user can utilize normal scene navigation to move/rotate around the object. In the content configuration scene, the user has several options, listed below.
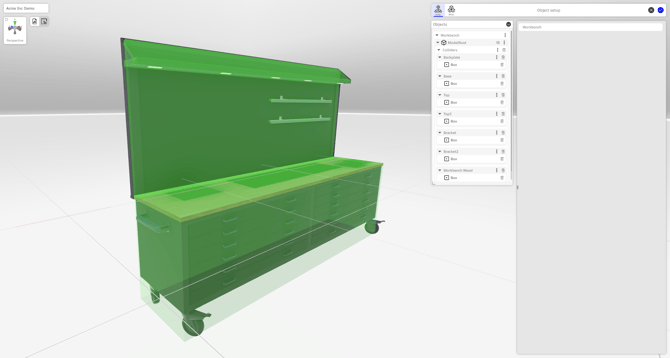
Object hierarchy
This list shows the object hierarchy with any sub-meshes and child components. It is not possible to re-arrange this hierarchy – this must be done in external 3D modelling software.
Target reference
It is possible to add additional empty child objects (called Target References) inside the Procedure Builder. Target References can be used as the target for Grab and Place operations, Use Tool operations and Transform Object actions to have a shared offset. This makes it possible to set and adjust the offset of multiple operations and actions in one place.

Users can add another Target Reference by clicking the ´+´ in the Objects panel. A Target Reference has the following data associated:
- Target: The name of the parent in the Object hierarchy where the Target Reference was created.
- Position: The position relative to the Target parent.
- Rotation: The rotation relative to the Target parent.
- Scale: The scale relative to the Target parent.
- Layer: Options to define specific layer attributes:
- Default: No additional functionality
- Teleport: Trainees can teleport onto any colliders added to the Target Reference
- Ignore Collisions: When trainees navigate the procedure, it is possible to walk through any colliders attached to the Target Reference. This is needed for certain operations such as the Move Inside Area operation.
Collider description
Colliders are used to define physical shapes that interact naturally with other physical objects, like dropping a tool on a table, ensuring that the tool collides with the table instead of falling through it.
When importing a 3D model, SynergyXR automatically adds colliders to the object and all child-objects to speed up content configuration. From the "Target Menu" users can choose to "Remove Colliders" to remove these automatically added colliders. By clicking the "Add Auto Colliders" button, colliders are automatically added to all child objects.
Additional colliders are created similarly to Target References and automatically get the Target Reference or component of the 3D object assigned as their Target parent. Users can configure three different types of colliders:
- Box: A box-shaped collider defined by:
- Center: Position relative to the Target parent.
- Size: The size of the box collider defined by an x-, y- and z-size
- Sphere: A sphere-shaped collider defined by:
- Center: Position relative to the Target parent.
- Radius: Size of the collider defined by the radius.
- Capsule: A capsule-shaped collider defined by:
- Center: Position relative to the Target parent.
- Radius: Size of the cylinder part of the collider defined by the radius.
- Height: Size of the collider defined by the height.
- Direction: ‘0’ defines a capsule lying down along the x-axis; ‘1’ defines a capsule standing up along the y-axis, and ‘2’ defines a capsule lying down along the z-axis. All relative to the rotation of a target parent.
The Procedure Builder will always try to adjust the size of the collider to fit the size of the object it is attached to. Users can always adjust the position and size of the collider by changing the values directly in the input fields, or more conveniently by dragging the small green cubes that define the control points of the collider.
Since colliders do not have any rotations, users must add a Target Reference to the Object and set the desired rotation to this. Then, a collider can be added to the Target Reference to get the desired rotation relative to the Object.

It is possible to show all colliders for a given object by clicking the "Show/Hide colliders" button in the top-left corner:
Grab points
Grab points allow the user to define how the object is grabbed in VR. If none are defined, SynergyXR will make a best guess, but for the ultimate control, users should consider defining custom grab points. These are located under the Misc. tab of the Content Configuration.

Adding a grab point will spawn a hand emulator that the user can move and rotate around using a 3D gizmo in the content configuration scene. It is possible to define the following parameters:
- Position: The positional offset from the center of the object.
- Rotation: The rotation of the hand.
- Hand pose type: Defines which hand pose should be used when the trainee grabs the object. Using a drop-down menu users can choose between ‘idle’, ‘point’, ‘pinch suggest’, ‘pinch’, ‘grab suggest’, ‘grab’, ‘grab pen’, ‘grab eraser’, ‘grab laser pointer’, and ‘grab tablet’. The hand emulator will reflect the chosen hand pose type.
It is possible to define multiple grab points for both left- and right-hand side, but only the first in the list will be used when trainees go through the finished Procedure.
3D content instance
The user can press ‘Confirm’ to finish the configuration. This adds the fully configured 3D object to the "Imported files" in the Content menu.
An instance of the 3D object automatically appears in the scene. Users can add additional instances by pressing the blue ´+´ located directly under the configured 3D object in the Content menu. Each instance can have the following parameters defined:
- Name: The name of the instance in the Scene objects hierarchy. This is an ID that should be unique in the procedure allowing you to uniquely reference it in individual Steps.
- Position: The position in the scene. This can either be set by adjusting the 3D gizmo in the scene, or by manually typing in digits in the input fields. When adjusting the 3D gizmo, users can switch between world-rotation and local-rotation by pressing ‘x’ making it easier to move object that have an arbitrary rotation.
- Rotation: The rotation in the scene. This can either be set by adjusting the 3D gizmo in the scene, or by manually typing in digits in the input fields.
- Scale: The scale of the object in the scene, relative to the originally configured 3D object. This can either be set by adjusting the 3D gizmo in the scene, or by manually typing in digits in the input fields. We recommend using uniform scaling to avoid stretching the object on one or more axis.
- Enabled: Boolean toggle defines if the object is enabled and visible in the beginning of the procedure. Users can use the Change Visibility action to change this in individual steps.
All instances are linked to the configured content. Users can always adjust the configuration by pressing the cogwheel icon next to a configured 3D object. Any changes made to the configuration are automatically applied to all instances added to the scene.
Video content
User can import video content to be placed in the Procedure. Videos can be interacted with as any other 3D object using many of the available Operations. Videos can also be manipulated using several of the available Actions (e.g., Change Visibility or Transform Object). A special action called Play Video can be used to control the video.
Image content
Users can also import image content, that can be used for the action called Change Image. Both .PNG and .JPEG file formats are supported.
In addition, users can create instances of images and place these as objects in the procedure.
Image instances are treated like any other object in a procedure, and can also be used as the target of e.g. a Look At or Grab and Place operation. Image instances can also be manipulated using existing actions, incl. Change Visibility (hide or show the image) and Transform Object (move, scale and/or rotate the image).
Builders can also enable transparency in case the image has a transparent background, and select the "Flip Backside" if the image should be mirrored on the backside.
Audio content
Users can also import audio content, that can be used for the action called Play Audio. Both .MP3, .WAV and .OGG file formats are supported.

Audio files can also be generated from text – using a similar method as for guidance in steps. Choose the ‘Build Sound From Text’ option, and add the text in the input field and press the play button. Audio can be generated in several languages.