
What is a Trigger Zone Event?
A Trigger Zone event is an event with an area defined by a collider with its Layer option set to "Ignore Collisions", so that the event is activated when the user enters this area. Think of it as an invisible collider that looks for activity and reacts automatically.
Why use Trigger Zone Events?
- Safety Training: Simulate real-world hazards without exposing learners to risk.
- Process Compliance: Ensure interactions aren’t skipped or ignored in restricted areas.
- Immersive Feedback: Provide instant warnings, guidance, or corrective actions when a user enters a zone.
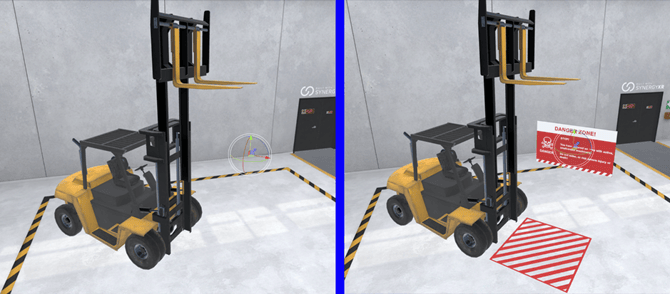
In the example above, the event is placed under the raised forks. The event is triggered whenever the user walks into this area, which enables a floor marker, a warning sign and an alarm sound. The user is told that the defined area is unsafe and should be avoided. This will happen independently of the procedure’s main flow.
Creating your Trigger Zone Event
You will need:
- An open space in the Procedure Builder.
- Assets:
-
- A floor marker onto which you will add a Target Reference and its Collider to define the Trigger Zone.
-
- A warning sign or card with text and/or visuals that inform the user they’ve entered a dangerous area.
-
- An object to which you can associate hazardous circumstances.
Add Content
- In this tutorial, the area under the raised forks of the vehicle is the trigger zone, so the forklift is added first.
- Add the Floor Marker.
- Adjust the size and position to your own preference.
- Do the same for the Warning Sign.
- Navigate to your Content tab and add your preferred sound.

Configure the Floor Marking’s Target Reference
- In the content tab navigate to your Floor Marker model and press the cogwheel symbol to edit the object.
- Press the bin icon next to your Floor Marker model to remove the collider.
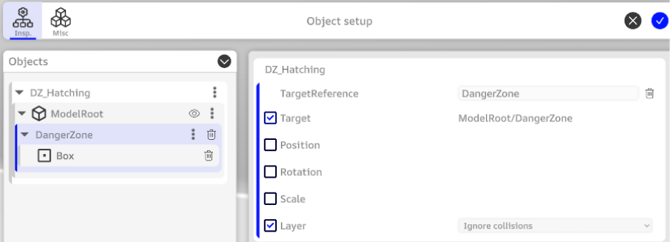
- Press the three-dots symbol next to your model’s name and choose Add Target.
- Rename your Target Reference to your liking - in this example we call it DangerZone. Click on Rename Reference when prompted by the system.
- Enable Layer and choose Ignore Collisions from the drop-down menu. This is done so users are able to walk into the collider and thereby activate the event.
Configure the Target Reference’s Collider
- Press the three-dots symbol next to the target reference you just created.
- Choose Add Collider.
- To better see your colliders, select the Show/Hide Colliders on the top left of the screen.
- To ensure the user triggers the zone when entering it, make the collider as tall as a person (or taller). This does not have to be accurate and can be adjusted later if needed.
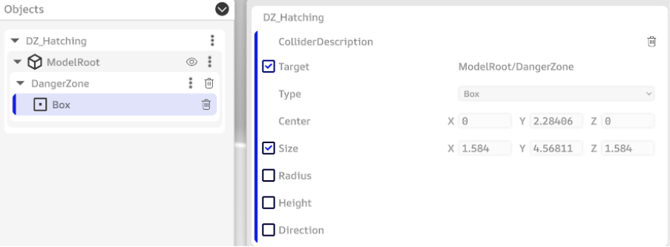
Your Target Reference’s collider should look something like this (in Blue).

Hiding the Trigger Zone Visuals and Toggling your Event
- Go to the steps tab and navigate to your first operation.
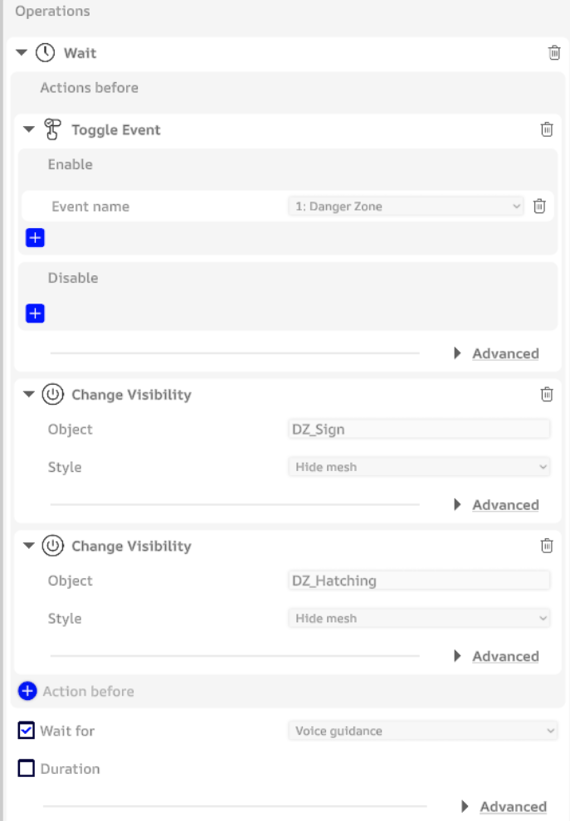
- Add two Actions Before and choose Change Visibility for both.
- Assign your Floor Marker and Warning Sign to them and select Hide Mesh for both. It is important you only hide the mesh and not disable the object since that will prohibit the user from interacting with the object.
- Add a third Action Before and choose Toggle Event.
- Check the Enable option and press the plus sign.
Your panel should look like the image below.
Recap
- Why did we remove the Floor Marker’s collider?
Because it was not needed as the collider would instead be added to the target.
- Why did we add a Target Reference to the Floor Marker model?
By adding a target reference, we can attach the collider to it, set its layer type and rotate it as necessary.
- Why did we choose Ignore Collisions in the Layer option?
When collisions are enabled, the zone would act like a solid collider, blocking the user from entering and activating the event. With Ignore Collisions, the collider will not block objects or the user, so it ensures that it only works as a trigger area.
- Why is the Collider we created blue?
Colliders that are set to Ignore Collisions are colored blue.
- Why did we add the Change Visibility actions?
Because all the visuals were visible at that point in the setup, defeating their spontaneous and accidental nature.
- Why did we choose Hide Mesh instead of Disable Object?
When you use Hide Mesh, the object is hidden from view, but its collider is still enabled. With Disable Object, the object is both hidden and its collider disabled as well.
- Why did we add Toggle Event at this point in the procedure?
Because we want the event to be enabled from the start.
- My Event Name drop-down menu is empty. Why?
Because we have not created the event yet.
Create the Event
- Click on the events tab.
- Press the blue plus icon to add an event.
- Give your event a name in the Event ID tab, e.g. DangerZone.
- Ensure the Repeat checkbox is set to True.
Add an Event Step
Here we tell the system what operation the user needs to perform to trigger the first step of the event.
- Press the plus sign within the steps window. This will add an Event Step.
- Press the plus sign next to operation and choose Move Inside Area.
You must assign the object to which we attached the blue collider before, as this will act as your trigger zone.
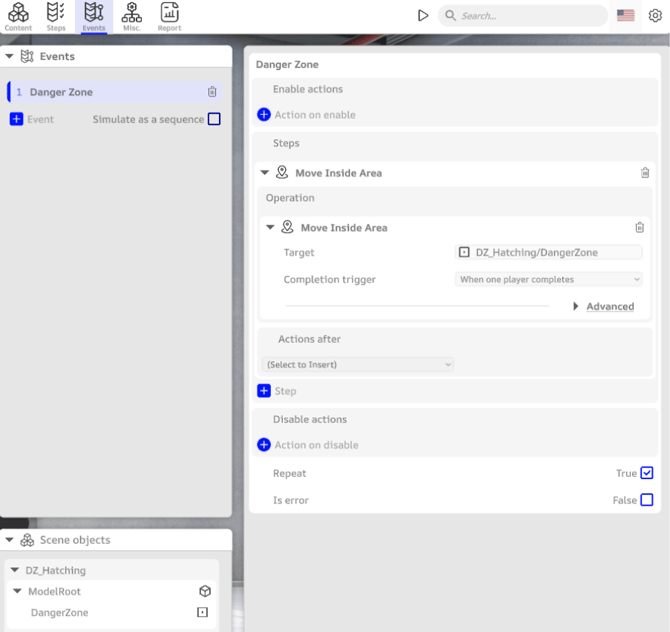
Under your Hazard Zone model in the hierarchy, click and drag your DangerZone Target Reference into the Target field.
Define your Actions After
Now we will tell the system what actions occur when the user activates the step in the event. We want three things to happen: show the Hazard Zone, the Warning Sign and play an Alarm sound.
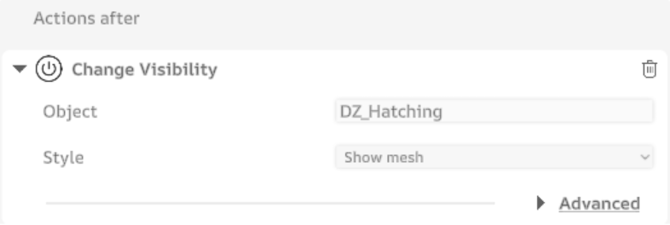
- Open the drop-down menu under Actions after.
- Choose the Change Visibility action.
- Click and drag your Floor Marker model from the hierarchy into the Target field.
- Choose Show Mesh from the Style menu.
- Repeat this for the Warning Sign model.
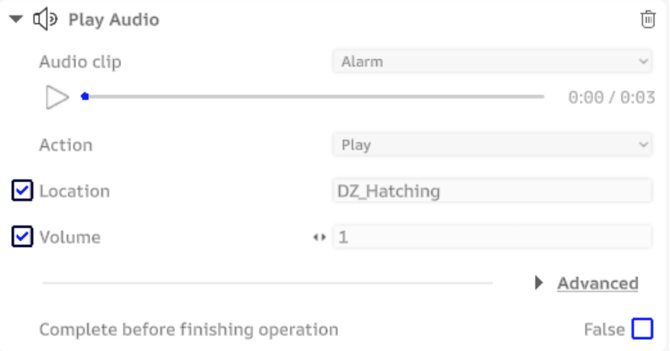
- Add a Play Audio Action and select your preferred audio clip from the menu.
- Enable Location and drag your Floor Marker model into the corresponding field. This will ensure the sound is spatial and is played from the object.
- Click on Advanced and enable Volume and set your preferred value.
- Uncheck the Complete Before Finishing Operation option.
Now the system must know what the user needs to do to revert the actions. The process is nearly identical, with some minor changes.
- Add another step and add a Move Inside Area action.
- Repeat what you did for the previous step.
- This time, click on Advanced and check the Area is outside target.
Area is outside target tells the system that the target for this operation lies outside the collider. It inverts the usual condition, so the event step will trigger when the user exits the area.
Like before, we will add the same three actions after, but with some changes.
- Choose Hide Mesh for both Change Visibility.
- For Play Audio, choose Stop.

Recap
We told the system we want a Move Inside Area to be the operation that triggers this event step. This consists of the Target Reference’s collider we created before.
With the Actions After, we defined what happens when the user triggers the event step: when they move inside the area, they will be visually and audibly notified of having crossed into a dangerous zone.
- Why did we set the Repeat to True?
If it were False, the event would stop when the user moves out of the designated area and thereby completes the last event step. This way, the event will repeat each time the user moves in and out of said area, until the entire event is disabled.
- Why did we choose the Complete Before Finishing Operation for the Play Audio Action?
If this option is checked, the event step will wait until the audio finishes playing before moving on to the next action or step.
If disabled, the audio will stop as soon as the user leaves the trigger zone.
- We added two Change Visibility actions, but the corresponding meshes have been visible from the start. Why?
That’s a good observation. In this scenario we do not want the user to know of these trigger zones beforehand. We want them to unintentionally interact with them, which brings us to the next stage.
Enabling your Event
Now that your event is fully built, all you need to do is go back to your steps tab and select it from the Toggle Event Action in the Event Name menu.

You’re now ready to test your first event. Go ahead and try it.