How to create an Event in the Procedure Builder - Interaction based
This article will show you how to create an interaction based event in the SynergyXR Procedure Builder.
What is an Interaction-based Event?
An Interaction-based Event is one that is initiated when a user interacts directly with an asset, like picking up an object, pressing a button, or flipping a switch. This is in contrast with more passive conditions, such as moving inside an area.
Why use Interaction-based Events?
- Increase Realism: Interactions like picking up a box or pushing a button feel natural when they trigger immediate feedback.
- Reinforce Learning: Allows users to connect their actions with outcomes, improving their understanding of cause and effect.
- Support Safety Training: They can simulate unsafe scenarios or actions (like carrying out tasks without PPE), while providing instant corrective feedback.

The images above showcase a short sequence of interaction-based Events, which are arranged in a cascading or “leading” fashion. This means that the completion of one Event automatically triggers, or leads, the user into the next event in the sequence.
In this example, the user grabs and places the box on the left, thereby triggering the next event in the chain, which consists of a Grab and Place operation too.
Note on Context
In the trainings scenarios shown in these articles, Events are presented in isolation to highlight specific functionalities and usage.
This may suggest that what is shown here could be implemented by using Steps instead. It is important however to keep in mind that each Event should imagined as being part of a broader procedure.
When applying these examples in your own work, always think of how each Event would integrate with other Events and Steps within a complete workflow.
Note: This is the second article of this series. It assumes the reader is familiar with the basics of both the Procedure Builder and the Events system. Therefore, basics concepts and practices, such as the importing of models or setting up colliders, will not be addressed here.
Creating your Interaction-Based Event
You will need:
- An open space in the Procedure Builder.
- Assets:
- One or more objects to which you can link dangerous circumstances.
- A warning sign or card with text/visuals that tell the user they’ve committed one or more dangerous actions.
- Audio files to enhance immersion (for placement of objects, alarm, engine running, etc.)
This procedure consists of two Steps and two Events. There are six models and six audio files. Additionally, two of the models, namely the Forklift_Set and the Pallet_Set, are parents, meaning that they have additional models (children) grouped under them. In the case of the Forklift_Set, this consists of the vehicle’s main body, the vertical bars and the forks.
There are four models under the Pallet_Set: the wooden pallet with the stack of boxes, two extra box models and the red floor marker.
Note: Models are grouped this way primarily so that they can be transformed as one unit, instead of importing and positioning them individually in the PB.
Moreover, this not only helps organize your assets, but also referencing them in the PB workflow.

- Here, the area under the raised forks of the vehicle is the area of interest, so the forklift is added first.
- Add the Pallet_Set or similar model.
- Add the two individual box models.
- Add the Warning_Sign and CrushZone_Sign models.
- Adjust sizes and positions.
- Add your preferred sounds.
- Adjust the models’ colliders.
Before building the Events, we must prepare the models, so they are left in the desired state at the start of the procedure.
- Add five Change Visibility actions as Actions Before to your Wait operation in your introductory step.
- Add your Box_03 and Box_04 models as the objects for the first two Change Visibility actions and choose Disable Object for both as the Style setting.
- Set the Pallet_Marker, the Warning_Sign and the CrushZone_Sign as the objects for the other three Change Visibility actions and choose Hide Mesh as the Style setting.
- For additional immersion, you may choose to add here a sound of an engine running, to suggest the forklift was left running.
- Add a Toggle Event action as an Action After.
- Add two Change Visibility actions as Actions After.
- Set the Warning_Sign and Pallet_Marker models as the Object and choose Show Mesh as the Style setting.
- Add a second Step with a Wait operation.

Recap:
- Why did we both hide and show some of the assets within the same step?
This is an illustrative two step procedure. How the assets are presented is entirely subjective. In this case, they were implemented so that they are hidden the moment the user enters the space, and some made visible again once the introductory message is read out.
This way the assets are shown before the second message begins to be read aloud.
- Why did we choose Disable Object for some assets and Hide Mesh for others?
When you use Hide Mesh, the object is hidden from view, but its collider is still enabled. With Disable Object, the object is both hidden and its collider disabled as well.
- Why did we add a second step with just a Wait operation?
This step serves as a simple instruction, wherein we invite the user to both acknowledge and to begin to solve the scene before them.
- What is the purpose of the Box_03 and Box_04 assets?
There are four box models in total. 03 and 04 are grouped under the Pallet_Set parent. Why? This allows us to bring them in with a pre-defined position, instead of importing and positioning them individually. These two boxes are stand-in assets, meaning that they will replace other assets that will be disabled at a later stage in the procedure, in this case boxes 01 and 02. Why this is necessary will be covered shortly.
- Go to the Events tab.
- Add an event and name it Box_01.
- Choose Grab and Place as your Activate Operation.
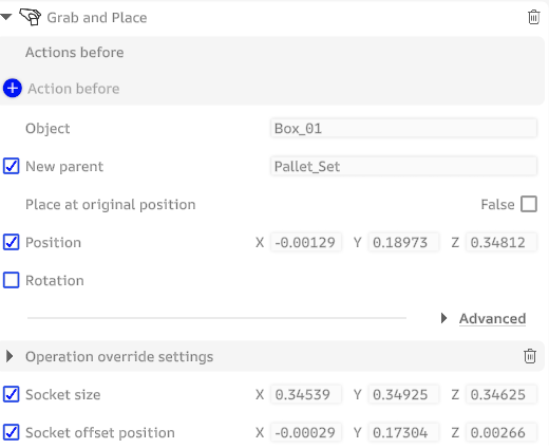
- Drag the Box_01 asset into the Object field.
- Enable New parent and assign the Pallet_Set asset.
- Enable Position and position it so that Box_01 and Box_03 are overlapping completely.
- Under Advanced, enable Socket size and scale it so that it’s the same size as the box.

- Do the same for Socket offset position so that the socket is in the same position as the box.
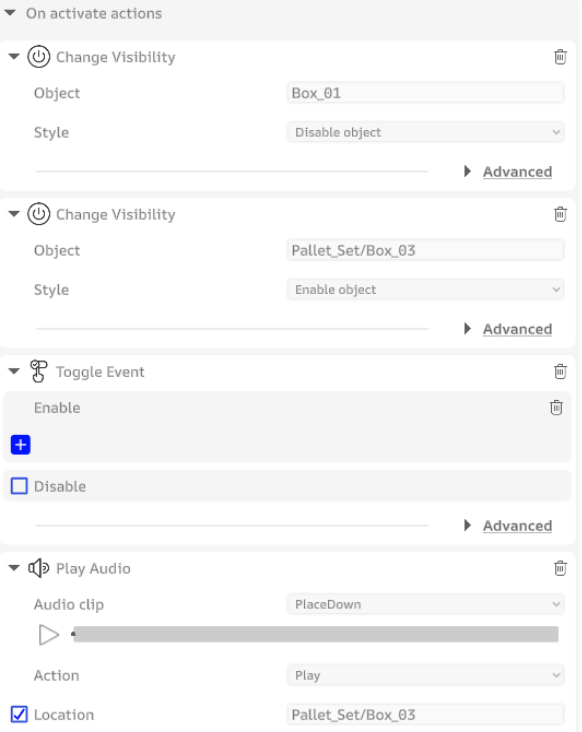
- Add one Change Visibility action and assign Box_01 to it, choosing Disable object.
- Add a second Change Visibility action and assign Box_03, choosing Enable object.
- Add a Toggle Event action.
- Optional: add a Play Audio action and add a sound that suggest the setting down of an object for extra immersion. If you do so, enable Location and set Box_03 as the asset where you want the audio to be played from.
- Go into the Actions After of your first step and choose Box_01 from the dropdown menu of your Toggle Event action.

Recap:
- Why did we disable Box_01, the object we grabbed and placed?
When Grab and Place is performed within an Event, the operation is not actually concluded when the asset is placed at its destination. This means you could grab the box and place it anywhere else again, which is not what we want.
- Why did we enable Box_03?
This is our first stand-in asset, and it’s meant to address the situation described above. In this case, as soon as Box_01 is placed at its intended location, it is immediately disabled, and Box_03 is enabled right away. This ensures that the user cannot grab the box again while maintaining visual fidelity.
- Why was a Toggle Event action added here?
We want to establish a short sequence of events, where performing one operation will enable the subsequent event. In this case, when Box_01 is placed, the second event will be enabled, allowing the user to interact with the second box.
- Repeat the same steps you did before.
- Repeat the same process you did for the first Grab and Place operation, except add Box_02 this time and position it at Box_04’s location.
- Repeat the process with two Change Visibility actions, this time disabling Box_02 and enabling Box_04.
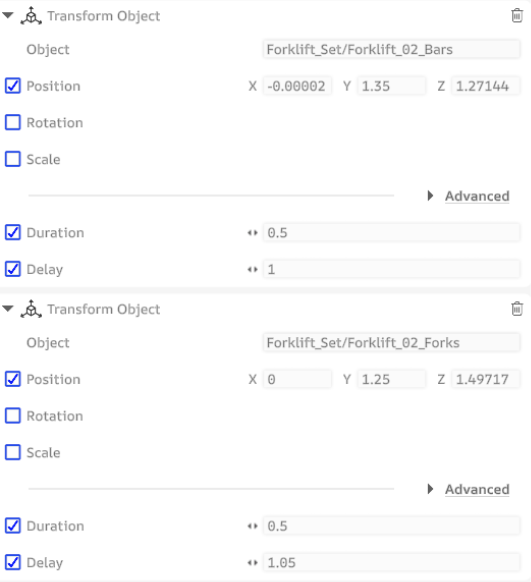
- Add one Transform Object action and assign the Forklift_02_Bars asset.
- Enable Position and lower the bars.
- Enable Duration and add a value of 0.5
- Enable Delay and add a value of 1.
- Add another Transform Object action and assign the Forklift_02_Forks asset.
- Repeat the same actions, except, add a value of 1.05 as the Delay.
- Add a Play Audio action and add one that suggests the sudden fall of metal equipment.
Your settings should look like this:

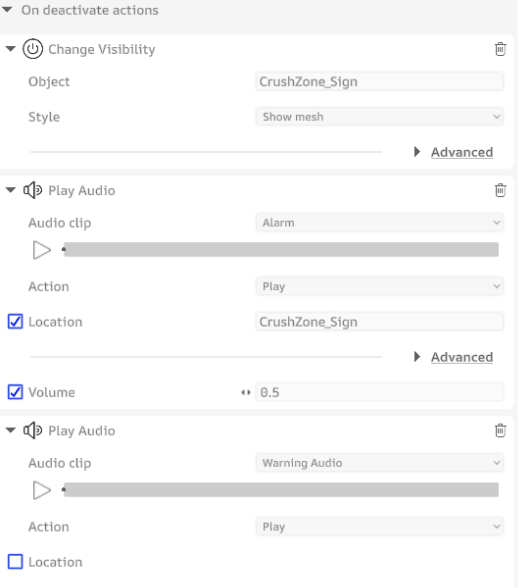
10. Add a Deactivate Operation
- Add a Press operation and choose the Warning_Sign asset as the Target.
- Choose Distance Press as the Press Type.
- Add a Change Visibility action and choose the CrushZone_Sign or your warning sign of choice. Select Show Mesh for Style.
- Optional: add two Play Audio actions, one for an Alarm sound and one for a final message.
- For the latter, go to your Content tab and add a sound. Choose the Build Sound from Text option. You can now create your custom sound and add it to the second Play Audio action.

Recap:
- What was the goal with the two Transform Object actions?
We wanted the result of placing the second box to be the fork apparatus suddenly coming down, to suggest to the user that they have carried out a dangerous action.
- Why were Duration and Delay values added to these Transform Object actions?
The duration value defines how long it takes for the asset to move into its new position, while the delay determines the period the action must wait before it begins. We want wanted the assets to come down rather fast, but to prevent it from happening as soon as the box is placed.
- A Deactivate Operation and On Deactivate actions were added in the second event. Why?
These served the purpose of providing the user with informational closure. By pressing the warning sign, the user is notified audibly and visually to the dangerous and erroneous action they performed. Otherwise, after placing the second box, the user would not have received feedback.
- Can I create other types of sounds with the Build from Text function?
No. This only allows you to convert the textual input into an audio file that you can then add to your Play Audio actions. These can be useful when you wish to give the user this kind of feedback without having to resort to the Steps.
