
Watch the video for a short introduction and read the article for more details.
One of the most powerful parts of the Procedure Builder is the Events system. It allows you to add interactive additions to your Steps. These Events can be used to create optional learning moments, provide additional information, alternative methods or as fail states if the Steps are not performed correctly.
What are Events?
Events are sequential step additions that run in parallel with Steps. However, unlike steps (which are mandatory linear interactions), events can be optional checks, warnings, or side actions. They allow you to set up specific user interactions at any given point, which are not part of the main procedure flow.

Why use Events?
Events make your training more dynamic, flexible and realistic. In the real world, people make mistakes or do things out of order. Moreover, they can provide an additional layer of safety, because the user is being provided with feedback when such mistakes occur. Therefore, events allow you to:
- Simulate errors or unsafe actions (what happens if you perform the wrong operation?).
- Add optional interactions or exploration (additional learning opportunities, if the user chooses to investigate something).
- Enable parallel checks (monitor operations or conditions in the background).
- Provide Real-Time feedback (the procedure responds dynamically, like the real world would, with immediate consequences or feedback)
Types of Events
Events define when something could happen in your procedure. They probe for triggers, like entering an area or pressing a button, and then run actions.
Here are a few examples of types of events you can define in the Procedure Builder:
- Trigger-based Events: events that are activated when a user enters or exits an area - can be defined using the Move inside area Operation.
- Interaction-based Events: events that are activated when the user interacts with something - e.g. pressing a button or activating a lever.
- System-driven Events: events that are automatically activated by the system - e.g. using a Wait Operation to automatically activate the event after a period of time.
Understanding Events in the Procedure Builder
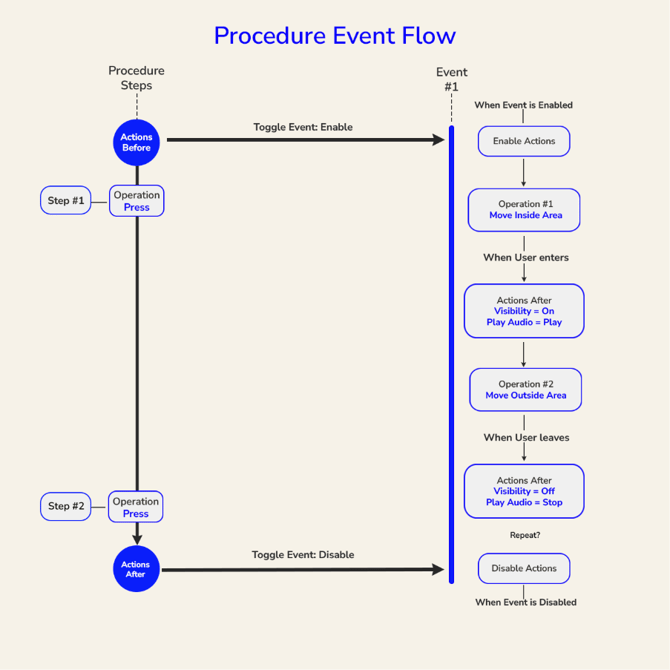
A simple way to understand events is to see them as extra steps that are triggered by the user’s behavior during the main steps of the procedure. The flowchart below represents the relationship between Steps, Operations, Actions and Events.
Let’s break it down.
How Steps and Events Work Together
A step includes an operation that the user must complete, while an event listens in the background for conditions (like entering an area). Within steps you can enable or disable events using the Toggle Event Action.
Each event can be made up of multiple Event Steps. Each of those event steps contains one single operation, and a list of Actions After which are triggered by the user completing the specified operation.
In the example above, the procedure consists of one Step Group that contains two steps and one event. This event has two event steps with their corresponding operations. Each of these event steps have two Actions After each.
Note that in this example, Enable Actions and Disable Actions are included in the flow but left unused. These are used if you want something to happen when the event is first enabled or finally disabled, but not necessarily triggered.
Step #1
- Actions Before: Toggle Event (Enable).
- Operation: Press.
- Actions After: Nothing added.
We assigned a Press operation in the first step. This could've been any operation, but in this example, we used a Press operation. You can add Actions Before and Actions After, like a Toggle Event action, added here as an Action Before. This defines the point from which the Event is enabled.
Step #2
- Action Before: Nothing added.
- Operation: Press.
- Actions After: Toggle Event (Disable).
A Press Operation was added to Step #2, with an Action After, where another Toggle Event was added, this time to tell the system that this is the stage where we want the event to be disabled. It is important to note here as well that the Press operation is just an example and any operation that could've been used. The step number being #2 is also just for demonstration purposes as this could be done in any Step after Step #1.
Creating the Event
Once the Event is enabled, it runs the following logic:
- Enable Actions: None added.
- Event Step
- Operation: Move Inside Area
- Actions After: Toggle Visibility and Play Audio
We defined Move Inside Area as the task to perform to activate the first event step. As soon as the user enters this area, Change Visibility actions are applied to one or more assets to make them visible, as well as having audio play via a Play Audio Action. The event then proceeds to the next event step:
- Event Step
- Operation: Move Inside Area
- Actions After: Toggle Visibility and Play Audio
- Disable Actions: None added.
We define a second Event Step in an identical way, except we want the opposite to happen, that is, when the user steps out of the area, the assets will be hidden or turned off. Additionally, until this Event is disabled in the procedure, it maintains a repeatable nature, meaning that the user can step in and out of the defined area and the event will respond accordingly.
Best Practices
- Keep events feedback short and clear.
- Use events to teach through mistakes or model optional interactions.
- Always test with users to make sure events feel natural and useful.