
Get an introduction to the SynergyXR Manager where you can upload and manage your digital content.
Introduction
To upload new Content or to manage existing content available in a Workspace, users with the Author or Admin role must use the SynergyXR Manager.
Upload content to a Workspace
Click the Upload button on the top-right, then drag and drop to upload your new content.

Several options are now available – some mandatory and some optional:
- Name - change display name users will see when browsing for content
- Add tag - add at least one searchable tag to enable users to find the content in the SynergyXR applications - this is the only mandatory action.
- Description – a longer description giving more information about the content. This is shown to the user in SynergyXR mobile app.
- Web Link – link to e.g. product webpage. This can be accessed by the user in SynergyXR
- Any errors preventing upload will be shown. This could be the use of an invalid character in the file name, or too large file size.

Organize content in a Workspace
It is possible to filter the shown content based on content type (image, 3d models, pdf or video) by choosing content type in drop down menu:

Hovering the mouse cursor over a piece of Content reveals an "Edit button". By clicking the edit button, additional content information can be accessed

Users can modify all the same information available during content upload. All this information can freely be changed without any danger of compromising any applications.
Other options are also available:
- Download:
It is possible to download the content locally to the PC by pressing the download button. This will launch Windows file browser enabling the user to specify where the downloaded file will be saved. - Replace file:
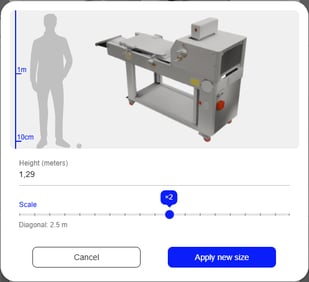
In case there is a new version of the content, press the "Replace file" button. This will launch a Windows file browser enabling the user to browser for the updated file. It is only possible to update the content with the same file type. Updating content like this will automatically ensure that the new updated version will now be shown to the user all Spaces the content is used. - Adjust scale:
This allows users to adjust the scale of the content in case it was uploaded slightly too big or too small.
- Delete:
It is also possible to delete content from the Workspace by pressing the delete button. Deleting content is irrevocable so please be careful when deleting content – it could potentially be used in an application without you knowing.
Watch the video below to see more in detail what options you have with the Manager depending on your user role:
- Content: Upload, edit and delete content.
- Users: Create and edit users.
- Spaces: Name spaces, get SCORM package, get QR code for AR spaces, set training space.
- Plan session: Invite users for a planned session in the Manager to ensure all users to join the same session.